SAWH Steel Pipe
Production Flow of SAWH Steel Pipe
All steel coils will be strictly inspected and only qualified steel coils can be used to produce the SAWH steel pipe. Appearance inspection as well as physical and chemical inspection is performed. Appearance inspection contents include plate thickness, width, weight, appearance defects, etc. Contents of physical and chemical inspection contain tensile test, guided bend test, impact test, drop impact test, Charpy impact test, Vickers hardness test, metallographic inspection, etc.
JL-50000 drop-testing machine INSTRON 1000HDX Hydraulic
universal testing machine ZBC 2602N-2 Charpy impact
test machine ARL3460 Vacuum direct-
reading spectrometer Axiovert 40MAT metalloscope Digital hardness tester
The pre-uncoiling machine is imported from Germany. It unrolls steel coils, cuts coil ends and straightens front end of coils, making preparation for coiling. This procedure maximally optimizes coiling time and improves production efficiency.
The uncoiling machine is also imported from Germany. After pre-uncoiling, steel coils are placed on feeding trolley which will then convey the coils to the uncoiling machine. Under the drive of auxiliary device, steel plates are conveyed to leveling machine.
Steel plates with certain curvature is leveled by 7-roller leveling machine via plastic deformation. This procedure is a good guarantee for successive production.
This procedure is important for SSAW steel pipe production, during which, the plate end of previous steel coil is connected to the plate head of following steel coil. To ensure excellent connection effect, the central line of both steel coils should be in a line. Besides, to prevent joint fracture, beveled edges of plate head and end should be milled. Then, submerged arc welding can be performed.
We adopt the HSD-36 automatic plate ultrasonic inspector controlled by computer. This instrument features stable performance, high system sensitivity, high defect inspection rate and low false alarm rate. Meanwhile, it has multiple functions like automatic alarm, curve recording, saving and printing, and also swing-type examination. Inspection coverage rate reaches up to more than 90%.
In this procedure, edge milling machine is used, and steel plates are milled till the plate width is within certain tolerance limit. Hence, plate edge is smooth and stable steel pipe forming can be ensured. If necessary, the plate can be processed with beveled edge of certain shape to enhance welding quality. Our edge milling unit is composed of three sets of heavy-duty edge milling machines, laying solid foundation for high-quality pipe products.
This procedure effectively prevents formed steel plates from edge curling.
Based on 3-roller forming principle, this process makes for precise steel pipe forming. Parameter adjustment is controlled by servo motor, and maximum formed pipe diameter is up to 1620mm. During forming, tack welding is also conducted. Gas shielded welding technique is adopted for continuous welded joint tack welding, and laser tracking can effectively avoid welding deviation. Welding parameters can be recorded and saved in real time. The maximum welding speed can reach 12.5m/min.
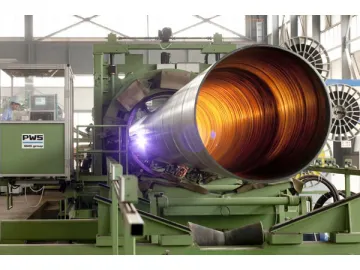
On-line steel tube cutting can be realized via plasma cutting machine, which also minimizes alignment tolerance of incision.
Broom head with air draft function is used to clean the inner wall of spiral welded pipe, making preparation for final welding.
Off-line submerged arc welding and automatic weld bead tracking system are utilized. Without disturbance of forming process, welding quality of submerged arc welded pipe is largely improved, and pipe performance is also enhanced. Parameters of internal and external welding as well as laser tracking can be recorded in real time. All the equipment is imported from German PWS, configured with DC1500 and AC1200 digital welding power source.
Welding slag and welding flux are removed in this procedure. The welding flux can be recycled.
We take advantage of specialized grinding machine for weld bead grinding by means of rotary abrasive belt. This machine is also configured with mist spraying and dust sucking devices to reduce pollution. After grinding, surplus height of weld bead is 0-0.5mm, and the weld bead realizes smooth connection with adjacent tube. Wall thickness after processing should be not less than 95% of nominal tube wall thickness.
X-ray industrial television inspector produces high pressure via high pressure generator, and gives out X-ray via X-ray tube. Then, the X-ray signal is transformed into geometric figure presented on fluorescent screen. Thus, nondestructive test for spiral welded pipe is performed, and high-definition imager displays all defects.
Pipe expanding machine performs steel pipe sizing and rounding under mechanical action. Meanwhile, cold hardening improves pipe yield strength, and also eliminates residual stress of weld seam.
Hydrostatic testing machine has the functions of automatic detection control and curve recording. It is used under standard or customer required pressure and dwell time. After testing, steel pipe should be strictly inspected, and pipe leakage or deformation is not allowed. In addition, this test also can eliminate certain amount of pipe residual stress and thereby enhances physical property of pipes.
We adopt the HSD-16 automatic ultrasonic inspector capable of automatic alarm as well as curve recording, saving and printing. Probe adjustment is fast and convenient since rotary table and ball screw are adopted. The entire system enables real-time inspection for weld seam position, and the probe is always at the right position.
This procedure sound ensures pipe end quality.
By adopting the end beveling machine, steel pipe ends are processed with beveled edge, making for high-quality welding.
Weighing equipment enables automatic on-line pipe weighing, featured by high efficiency and accuracy. Final inspection contents cover pipe diameter, wall thickness, ovality, length, straightness, weld seam size and shape, remanence, etc.
The finished steel pipes will be marked according to product standard or customer requirement.
Links:https://www.globefindpro.com/products/60500.html
