Kitchen Sink Selection Tips
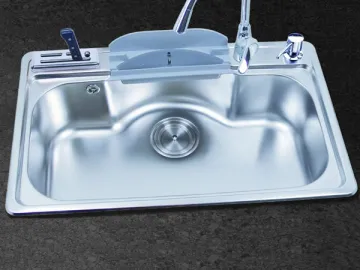
HALAO offers you 5 series of kitchen sinks which can be further divided into over 260 types. The wide selection of diversified sinks simply gives you wider choices. Whether it is a single-bowl sink, double-bowl type or triple-bowl configuration, each sink has its distinctive features.
1. Single-Bowl Sink Vs Double-Bowl Sink
Single-bowl sinks are typically priced lower than the other two types. For the same installation room, a single bowl configuration allows you to have more space for washing and cleanup. In simple words, if you cut a hole in your countertop, it would give you more washing space when you fit in the hole with a single-bowl sink than is possible with a double-bowl type. Another practical advantage of the single-bowl over the double-bowl is that it requires simpler plumbing system.
For a space-limited kitchen, a single-bowl sink is a sweet set-up for your family. This sink, however, does have some drawbacks as it only meets your basic cleanup needs.
Double-bowl designs continue to grow in popularity. You will typically find them in a house with 2 or 3 bedrooms. The double-bowl comes in handy when you want to separate the garbage disposal function from the sink for basic cleanup. It takes up a space neither too large nor small, thus becoming the sink of choice for most modern families. In the contemporary kitchen design, the sink function is obviously expanded. Where the sink meets the base cabinet, a working area is added which allows the sink to store foods.
It is true that the shape of countertop will dictate how the sink should be shaped. The T-shaped countertop, for example, is designed to save the most space and use effort. A sink is most suitable for being installed around the corner of such a countertop.
When you have a double-bowl sink on hand, you can use one bowl to wash your pot and greasy rags while dealing with your veggies and fruits in the other. Two bowls mean two separate, complicated plumbing systems. This increases the chances that the sink drain breaks down.
To sum up, the double-bowl sink can do double duty, one bowl for washing greasy items and the other for food, while the single-bowl sink offers large space to work in with reduced chances of water splashing outside the sink.
2. Does Deeper Mean Better?
Deeper is not always better. You seldom need to fill the sink full of water during washing. Filling a deep sink is time-consuming and wastes water. In addition, you have to break your back to reach the water in a deep sink. Having a sink too shallow does you no good, either, because a shallow sink easily causes water splashes. The proper depth range of a kitchen sink is between 180mm and 210mm.
3. Why HALAO
You can rely on our kitchen sink design. Buy one of our sinks and enjoy it through years of daily use. There are mainly two manufacturing processes we will use in the sink construction: welding and one-piece stretch forming.
Many customers go for our stretch forming technology since the one-piece stretch-formed sink features no weld, does not capture bacteria, and has a strong bonding between the sink frame and bowl. A welded bowl sink is less popular among customers since the welding process requires great skills in order to avoid welding seams that might affect the beauty of the sink.
For ease of use, we add several other features to the sink such as the water trap which prevents sink leakage. Another interesting feature is the black pads that are stuck on the underside of the sink to prevent it sounding tinny when water rushes downs to hit the sink bottom.
In addition, we can add a knife block to the sink frame to facilitate the storage of cutting tools. Upon your request, we can send you a soap dispenser so that you can clean up the kitchen and sink easily after meals.
4. Stainless Steel Sink Installation and Maintenance
Presently available on the market are three types of kitchen sinks: enamel over cast iron, acrylic, and stainless steel. The stretch-formed stainless steel kitchen sink is by far the most popular choice for customers.
5. HALAO Tips
Pitfalls exist between good stainless steel sinks and customers. Most sink buyers tend to judge the sink quality by its magnetic property. This is no science. Due to variations in chemical compositions from smelting and different machining conditions, even the SUS304 steel is faintly magnetic. But if the sink shows strong magnetism, it must not be made of SUS304 steel.
6. Good to Know
Sink experts suggest that the sink should be in place a few days before the interior decoration is completed in case that the decoration worker accidentally damages the sink. Improper behaviors like pouring liquid chemicals into the sink would harm the sink surface.
I. Tips for Unpacking and Preparation before Installation
1. Open the box and take out the sink body and plumbing fixtures. Make sure all the parts are there to complete the sink assembly.
2. Treat your sink with care.
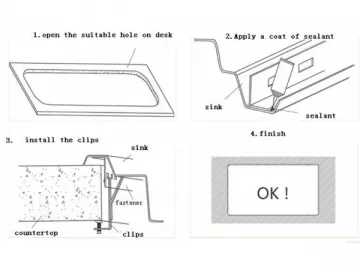
3. Cut a proper hole in the countertop according to the attached samples we give you.
4. Check if the black pad on the underside of the sink comes off. If it is loose, please re-stick it on the sink.
5. Take out the faucet from the box and check if all the parts needed are there to complete the faucet. Inspect the faucet for any cracks. Make sure the O-rings at both ends of the pipe fitting are not lost, misplaced or damaged.
II. Kitchen Sink Installation Tips
1. Set the faucet water pressure at the maximum 7.5kg/cm. Make sure the water temperature is no more than 90°C.
2. Before you install the faucet, please remove any impurities in the water inlet pipes, in case they enter the faucet causing damage to the valve or sealing elements, or clogging the faucet outlet pipe.
3. Please take care of the faucet during installation. Put cover or plastic bag onto the faucet while you are handling the faucet.
4. Now face the front of the faucet. Connect the hot water line to the left, red-marked side of the faucet while attaching the cold water line to its right, blue-marked side.
5. When you install the corrugated or braided hose, please be sure that the hose is tightened up properly. Too much torque would damage the threads on the hose while too little torque only enables a loose seal that results in leakage. To do it right, first apply the maximum tightening torque your hands can give to the hose. Then use a wrench to tighten the hose 1 to 2 full revolutions.
6. When the above steps are completed, check if all the parts are installed properly. Finally, turn on the faucet to let the water run.
III. Tips on How to Fix a Leaking Kitchen Sink
1. Remove all the impurities in the water lines. This step is especially important if you are using a new water supply system for the first time. Un-tighten the spout at the faucet outlet. When the removal job is done, put spout back in place.
2. Spray some water along the rim edges where the sink and countertop surface meets. Wait for a few minutes to see whether the water seeps through the gap between the sink and countertop.
3. Put the cap on your sink strainer and turn on the faucet to fill the two sink bowls with water until it overflows the top of the sink. Then switch off the faucet and observe if the water seeps through the narrow gap between the sink strainer and bowl.
4. Pull out the cap and watch if the water can pass through the strainer and out of the sink. Check if there is water leak at the pipe joint.
1. Topmount Sink Installation
2. Undermount Sink Installation
Links:https://www.globefindpro.com/products/61286.html
