898_1E
898_1E
INTERNATIONAL
STANDARD
ISO
898-1
Third edition
1999-08-01
Mechanical properties of fasteners made of
carbon steel and alloy steel —
Part 1:Bolts, screws and studs
Caractéristiques mécaniques des éléments de fixation en acier au carbone
et en acier allié —
Partie 1: Vis et goujons
Foreword
ISO (the International Organization for Standardization) is a worldwide federation of national standards bodies (ISO
member bodies). The work of preparing International Standards is normally carried out through ISO technical
committees. Each member body interested in a subject for which a technical committee has been established has
the right to be represented on that committee. International organizations, governmental and non-governmental, in
liaison with ISO, also take part in the work. ISO collaborates closely with the International Electrotechnical
Commission (IEC) on all matters of electrotechnical standardization.
Draft International Standards adopted by the technical committees are circulated to the member bodies for voting.
Publication as an International Standard requires approval by at least 75 % of the member bodies casting a vote.
International Standard ISO 898-1 was prepared by Technical Committee ISO/TC 2, Fasteners, Subcommittee SC 1,
Mechanical properties of fasteners.
This third edition cancels and replaces the second edition (ISO 898-1:1988) which has been technically revised.
ISO 898 consists of the following parts, under the general title Mechanical properties of fasteners made of carbon
steel and alloy steel:
¾ Part 1: Bolts, screws and nuts
¾ Part 2: Nuts with specified proof load values — Coarse thread
¾ Part 5: Set screws and similar threaded fasteners not under tensile stresses
¾ Part 6: Nuts with specified proof load values — Fine pitch thread
¾ Part 7: Torsional test and minimum torques for bolts and screws with nominal diameter from 1 mm to 10 mm
Annex A of this part of ISO 898 is for information only.
Mechanical properties of fasteners made of carbon steel and alloy steel —
Part 1:Bolts, screws and studs
steel when tested at an ambient temperature range of 10 °C to 35 °C.
Products conforming to the requirements of this part of ISO 898 are evaluated only in the ambient temperature range
and may not retain the specified mechanical and physical properties at higher and lower temperatures. Attention is
drawn to annex A which provides examples of lower yield stress and stress at 0,2 % non-proportional elongation at
elevated temperatures.
At temperatures lower than the ambient temperature range, a significant change in the properties, particularly impact
strength, may occur. When fasteners are to be used above or below the ambient temperature range it is the
responsibility of the user to ensure that the mechanical and physical properties are suitable for his particular service
conditions.
Certain fasteners may not fulfill the tensile or torsional requirements of this part of ISO 898 because of the geometry of
the head which reduces the shear area in the head as compared to the stress area in the thread such as countersunk,
raised countersunk and cheese heads (see clause 6).
This part of ISO 898 applies to bolts, screws and studs
¾ with coarse pitch thread M1,6 to M39, and fine pitch thread M8 3 1 to M39 3 3;
¾ with triangular ISO thread in accordance with ISO 68-1;
¾ with diameter/pitch combinations in accordance with ISO 261 and ISO 262;
¾ with thread tolerance in accordance with ISO 965-1 and ISO 965-2;
¾ made of carbon steel or alloy steel.
It does not apply to set screws and similar threaded fasteners not under tensile stresses (see ISO 898-5).
It does not specify requirements for such properties as
¾ weldability;
¾ corrosion-resistance;
¾ ability to withstand temperatures above 1 300 °C (1 250 °C for 10.9) or below 2 50 °C;
¾ resistance to shear stress;
¾ fatigue resistance.
NOTE The designation system of this part of ISO 898 may be used for sizes outside the limits laid down in this clause (e.g.
d . 39 mm), provided that all mechanical requirements of the property classes are met.
2 Normative references
The following standards contain provisions which, through reference in this text, constitute provisions of this part of ISO
898. At the time of publication, the editions indicated were valid. All standards are subject to revision, and parties to
agreements based on this part of ISO 898 are encouraged to investigate the possibility of applying the most recent
editions of the standards indicated below. Members of IEC and ISO maintain registers of currently valid International
Standards.
ISO 68-1:1998, ISO general purpose screw threads – Basic profile – Part 1: Metric screw threads.
ISO 83:1976, Steel – Charpy impact test (U-notch).
ISO 261:1998, ISO general purpose metric screw threads – General plan.
ISO 262:1998, ISO general purpose metric screw threads – Selected sizes for screws, bolts and nuts.
ISO 273:1979, Fasteners – Clearance holes for bolts and screws.
ISO 724:1978, ISO general purpose metric screw threads – Basic dimensions.
ISO 898-2:1992, Mechanical properties of fasteners made of carbon steel and alloy steel – Part 2: Nuts with
specified proof load values – Coarse thread.
ISO 898-5:1998, Mechanical properties of fasteners made of carbon steel and alloy steel – Part 5: Set screws and
similar threaded fasteners not under tensile stresses.
ISO 898-7:1992, Mechanical properties of fasteners made of carbon steel and alloy steel – Part 7: Torsional test
and minimum torques for bolts and screws with nominal diameters 1 mm to 10 mm.
ISO 965-1:1998, ISO general purpose metric screw threads – Tolerances – Part 1: Principles and basic data.
ISO 965-2:1998, ISO general purpose metric screw threads – Tolerances – Part 2: Limits of sizes for general
purpose external and internal screw threads – Medium quality.
ISO 6157-1:1988, Fasteners – Surface discontinuities – Part 1: Bolts, screws and studs for general requirements.
ISO 6157-3:1988, Fasteners – Surface discontinuities – Part 3: Bolts, screws and studs for special requirements.
ISO 6506:1981, Metallic materials – Hardness test – Brinell test.
ISO 6507-1:1997, Metallic material – Hardness test – Vickers test – Part 1: Test method.
ISO 6508:1986, Metallic materials – Hardness test – Rockwell test (scales A - B - C - D - E - F - G - H - K).
ISO 6892:1998, Metallic materials – Tensile testing at ambient temperature.
nominal tensile strength values, Rm, in newtons per square millimetre, while the ordinates show those of the minimum
elongation after fracture, Amin, as a percentage.
The property class symbol consists of two figures:
¾ the first figure indicates 1/100 of the nominal tensile strength in newtons per square millimetre (see 5.1 in
table 3);
¾ the second figure indicates 10 times the ratio between lower yield stress ReL (or stress at 0,2 % nonproportional
elongation Rp0,2) and nominal tensile strength Rm, nom (yield stress ratio).
The multiplication of these two figures will give 1/10 of the yield stress in newtons per square millimetre.
The minimum lower yield stress ReL, min. (or minimum stress at 0,2 % non-proportional elongation Rp0,2, min.) and
minimum tensile strength Rm, min.are equal to or greater than the nominal values (see table 3).
The chemical composition shall be assessed in accordance with the relevant ISO standards.
mechanical and physical properties set out in table 3.
Table 1 — System of coordinates
a .Boron content can reach 0,005 % provided that non-effective boron is controlled by addition of titanium and/or aluminium.
b. Free cutting steel is allowed for these property classes with the following maximum sulfur, phosphorus and lead
contents: sulfur 0,34 %; phosphorus 0,11 %; lead 0,35 %.
c. For nominal diameters above 20 mm the steels specified for property classe 10.9 may be necessary in order to achieve
sufficient hardenability.
d.In case of plain carbon boron steel with a carbon content below 0,25 % (ladle analysis), the minimum manganese
content shall be 0,6 % for property class 8.8 and 0,7 % for 9.8, 10.9 and 10.9.
e. Products shall be additionally identified by underlining the symbol of the property class (see clause 9). All properties of 10.9as specified in table 3 shall be met by 10.9, however, its lower tempering temperature gives it different stress relaxationcharacteristics at elevated temperatures (see annex A).
f. For the materials of these property classes, it is intended that there should be a sufficient hardenability to ensure a structure consisting of approximately 90 % martensite in the core of the threaded sections for the fasteners in the "as-hardened" condition before tempering.
g.This alloy steel shall contain at least one of the following elements in the minimum quantity given: chromium 0,30 %, nickel 0,30 %, molybdenum 0,20 %, vanadium 0,10 %. Where elements are specified in combinations of two, three or four and have alloy contents less than those given above, the limit value to be applied for class determination is 70 % of the sum of the individual limit values shown above for the two, three or four elements concerned.
h.A metallographically detectable white phosphorous enriched layer is not permitted for property class 12.9 on surfaces
subjected to tensile stress.
Two test programmes, A and B, for mechanical and physical properties of bolts, screws and studs, using the
methods described in clause 8, are set out in table 5. Regardless of the choice of test programme, all requirements
of table 3 shall be met.
The application of programme B is always desirable, but is mandatory for products with ultimate tensile loads less
than 500 kN if the application of programme A is not explicitly agreed.
Programme A is suitable for machined test pieces and for bolts with a shank area less than the stress area.
Table 4 — Key to test programmes (see table 5)
Table 6 — Minimum ultimate tensile loads – ISO metric coarse pitch thread
Table 7 — Proof loads – ISO metric coarse pitch thread
a. Where no thread pitch is indicated in a thread designation, coarse pitch is specified. This is given in ISO 261 and ISO 262.
b.To calculate As see 8.2.
c.For structural bolting 50 700 N, 68 800 N and 94 500 N, respectively.
Table 8 — Minimum ultimate tensile loads – ISO metric fine pitch thread
a.P is the pitch of the thread.
b.To calculate As see 8.2.
Table 9 — Proof loads – ISO metric fine pitch thread
The machined test piece shown in figure 1 shall be used for the tensile test. If it is not possible to determine the
elongation after fracture due to the length of the bolt, the reduction of area after fracture shall be measured
providing that Lo is at least 3 do.
When machining the test piece, the reduction of the shank diameter of the heat-treated bolts and screws with
d > 16 mm shall not exceed 25 % of the original diameter (about 44 % of the initial cross-sectional area) of the test
piece.
Products in property classes 4.8, 5.8 and 6.8 (cold work-hardened products) shall be tensile tested full-size
(see 8.2).
When carrying out the test, a minimum free threaded length equal to one diameter (1d) shall be subjected to the
tensile load. In order to meet the requirements of this test, the fracture shall occur in the shank or the free threaded
length of the bolt and not at the junction of the head and the shank.
The speed of testing, as detemined with a free-running cross-head, shall not exceed 25 mm/min. The grips of the
testing machine should be self-aligning to avoid side thrust on the test piece.
8.3 Torsional test
For the torsional test see ISO 898-7.
The test applies to bolts and screws with nominal thread diameters d < 3 mm as well as to short bolts and screws
with nominal thread diameters 3 mm < d < 10 mm which cannot be subjected to a tensile test.
8.4 Hardness test
For routine inspection, hardness of bolts, screws and studs may be determined on the head, end or shank after
removal of any plating or other coating and after suitable preparation of the test piece.
For all property classes, if the maximum hardness is exceeded, a retest shall be conducted at the mid-radius
position, one diameter back from the end, at which position the maximum hardness specified shall not be exceeded.
In case of doubt, the Vickers hardness test is decisive for acceptance.
Hardness readings for the surface hardness shall be taken on the ends or hexagon flats, which shall be prepared by
minimal grinding or polishing to ensure reproducible readings and maintain the original properties of the surface
layer of the material. The Vickers test HV 0,3 shall be the referee test for surface hardness testing.
Surface hardness readings taken at HV 0,3 shall be compared with a similar core hardness reading at HV 0,3 in
order to make a realistic comparison and determine the relative increase which is permissible up to 30 Vickers
points. An increase of more than 30 Vickers points indicates carburization.
For property classes 8.8 to 12.9 the difference between core hardness and surface hardness is decisive for
judgeing of the carburization condition in the surface layer of the bolts, screws or studs.
There may not be a direct relationship between hardness and theoretical tensile strength. Maximum hardness
values have been selected for reasons other than theoretical maximum strength consideration (e.g. to avoid
embrittlement).
NOTE Careful differentiation should be made between an increase in hardness caused by carburization and that due to
heat-treatment or cold working of the surface.
8.4.1 Vickers hardness test
The Vickers hardness test shall be carried out in accordance with ISO 6507-1.
8.4.2 Brinell hardness test
The Brinell hardness test shall be carried out in accordance with ISO 6506.
8.4.3 Rockwell hardness test
The Rockwell hardness test shall be carried out in accordance with ISO 6508.
8.5 Proof load test for full-size bolts and screws
The proof load test consists of two main operations, as follows:
a) application of a specified tensile proof load (see figure 2);
b) measurement of permanent extension, if any, caused by the proof load.
The proof load, as given in tables 7 and 9, shall be applied axially to the bolt in a tensile testing machine. The full
proof load shall be held for 15 s. The length of free thread subjected to the load shall be one diameter (1d).
For screws threaded to the head, the length of free thread subjected to the load shall be as close as practical to one
diameter (1d).
For measurement of permanent extension, the bolt or screw shall be suitably prepared at each end, see figure 2.
Before and after the application of the proof load, the bolt or screw shall be placed in a bench-mounted measuring
instrument fitted with spherical anvils. Gloves or tongs shall be used to minimize measurement error.
To meet the requirements of the proof load test, the length of the bolt, screw or stud after loading shall be the same
as before loading within a tolerance of ± 12,5 mm allowed for measurement error.
The speed of testing, as determined with a free-running cross-head, shall not exceed 3 mm/min. The grips of the
testing machine should be self-aligning to avoid side thrust on the test piece.
Some variables, such as straightness and thread alignment (plus measurement error), may result in apparent
elongation of the fasteners when the proof load is initially applied. In such cases, the fasteners may be retested
using a 3 % greater load, and may be considered satisfactory if the length after this loading is the same as before
this loading (within the 12,5 mm tolerance for measurement error).
8.6 Test for tensile strength under wedge loading of full-size bolts and screws (not studs)
The wedge loading test shall not apply to countersunk head screws.
The test for strength under wedge loading shall be carried out in tensile testing equipment described in ISO 6892
using a wedge as illustrated in figure 3.
The minimum distance from the thread run-out of the bolt to the contact surface of the nut of the fastening device
shall be d. A hardened wedge in accordance with tables 10 and 11 shall be placed under the head of the bolt or
screw. A tensile test shall be continued until fracture occurs.
To meet the requirements of this test, the fracture shall occur in the shank or the free threaded length of the bolt,
and not between the head and the shank. The bolt or screw shall meet the requirements for minimum tensile
strength, either during wedge tensile testing or in a supplementary tensile test without a wedge, according to the
values given for the relevant property class before fracture occurs.
Screws threaded to the head shall pass the requirement of this test if a fracture which causes failure originates in
the free length of thread, even if it has extended or spread into the fillet area or the head before separation.
For product grade C, a radius r1 should be used according to the formula
r1 = rmax 0,2
in which
r =d d
max a max s min2
where r is the radius of curvature under head;
da is the transition diameter;
ds is the diameter of unthreaded shank.
a dh according to ISO 273, medium series (see table 10).
b Hardness: 45 HRC min.
c Radius or chamfer of 45°.
Figure 3 — Wedge loading of full-size bolts
a For square neck bolts, the hole shall be adapted to admit the square neck.
to 1,7 d and re-tested on the wedge angle specified in table 11.
Moreover for products with head bearing diameters above 1,9 d, the 10° wedge angle may be reduced to 6°.
8.7 Impact test for machined test pieces
The impact test shall be carried out in accordance with ISO 83. The test piece shall be taken lengthwise, located as
close to the surface of the bolt or screw as possible. The non-notched side of the test piece shall be located near
the surface of the bolt. Only bolts of nominal thread diameters d > 16 mm can be tested.
8.8 Head soundness test for full-size bolts and screws with d < 10 mm and with lengths too
short to permit wedge load testing
The head soundness test shall be carried out as illustrated in figure 4.
When struck several blows with a hammer, the head of the bolt or screw shall bend to an angle of 90°-b without
showing any sign of cracking at the shank head fillet, when viewed at a magnification of not less than 3 8 nor more than 3 10.Where screws are threaded up to the head, the requirements may be considered met even if a crack should appear
in the first thread, provided that the head does not snap off.
NOTE 1 For dh and r2 (r2 = r1), see table 10.
NOTE 2 The thickness of the test plate should be greater than 2 d.
Figure 4 — Head soundness test
Table 12 — Values of angle b
8.9 Decarburization test: evaluation of surface carbon condition
Using the appropriate measuring method (8.9.2.1 or 8.9.2.2 as applicable), a longitudinal section of the thread shall
be examined to determine whether the height of the zone of base metal (E) and the depth of the zone with complete
decarburization (G), if any, are within specified limits (see figure 5).
The maximum value for G and the formulae for the minimum value for E are specified in table 3.
Key
1 Completely decarburized
2 Partially decarburized
3 Pitch line
4 Base metal
H1 is the external thread height in the maximum material condition.
Figure 5 — Zones of decarburization
8.9.1 Definitions
8.9.1.1
base metal hardness
hardness closest to the surface (when traversing from core to outside diameter) just before an increase or decrease
occurs denoting carburization or decarburization respectively
8.9.1.2
decarburization
generally, loss of carbon at the surface of commercial ferrous materials (steels)
8.9.1.3
partial decarburization
decarburization with loss of carbon sufficient to cause a lighter shade of tempered martensite and significantly lower
hardness than that of the adjacent base metal without, however, showing ferrite grains under metallographic
examination
8.9.1.4
complete decarburization
decarburization with sufficient carbon loss to show only clearly defined ferrite grains under metallographic
examination
8.9.1.5
carburization
result of increasing surface carbon to a content above that of the base metal
8.9.2 Measurement methods
8.9.2.1 Microscopic method
This method allows the determination of E and G.
The specimens to be used are longitudinal sections taken through the thread axis approximately half a nominal
diameter (½ d) from the end of the bolt, screw or stud, after all heat-treatment operations have been performed on
the product. The specimen shall be mounted for grinding and polishing in a clamp or, preferably, a plastic mount.
After mounting, grind and polish the surface in accordance with good metallographic practice.
Etching in a 3 % nital solution (concentrated nitric acid in ethanol) is usually suitable to show changes in
microstructure caused by decarburization.
Unless otherwise agreed between the interested parties, a 3 100 magnification shall be used for examination.
If the microscope is of a type with a ground glass screen, the extent of decarburization can be measured directly
with a scale. If an eyepiece is used for measurement, it should be of an appropriate type, containing a cross-hair or
a scale.
8.9.2.2 Hardness method (Referee method for partial decarburization)
The hardness measurement method is applicable only for threads with pitches, P > 1,25 mm.
The Vickers hardness measurements are made at the three points shown on figure 6. Values for E are given in
table 13. The load shall be 300 g.
The hardness determination for point 3 shall be made on the pitch line of the thread adjacent to the thread on which
determinations at points 1 and 2 are made.
The Vickers hardness value at point 2 (HV2) shall be equal to or greater than that at point 1 (HV1) minus 30 Vickers
units. In this case the height of the non-decarburized zone E shall be at least as specified in table 13.
The Vickers hardness value at point 3 (HV3) shall be equal to or less than that at point 1 (HV1) plus 30 Vickers
units.
Complete decarburization up to the maximum specified in table 3 cannot be detected by the hardness measurement
method.
Dimensions in millimeters
Key
1, 2, 3 Measurement points
4 Pitch line
Figure 6 — Hardness measurement for decarburization test
Table 13 — Values for H1 and E
a For P < 1 mm, microscopic method only.
b Calculated on the basis of the specification in 5.16, see table 3.
8.10 Retempering test
The mean of three core hardness readings on a bolt or screw, tested before and after retempering, shall not differ
by more than 20 HV when retempered at a part temperature 10 °C less than the specified minimum tempering
temperature and held for 30 min.
8.11 Surface discontinuity inspection
For the surface discontinuity inspection, see ISO 6157-1 or ISO 6157-3 as appropriate.
In the case of test programme A the surface discontinuity inspection is applied to test bolts before machining.
accordance with the provisions of 9.1 to 9.5.
Only if all requirements in this part of ISO 898 are met, shall parts be marked and/or described according to the
designation system described in clause 3.
Unless otherwise specified in the product standard, the height of embossed markings on the top of the head shall
not be included in the head height dimensions.
Marking of slotted and cross recessed screws is not usual.
marked with property classes. Manufacturer's identification marking is also recommended on products which are
not marked with property class.
For the purposes of this part of ISO 898 a distributor marking fasteners with his unique identification mark shall be
Marking symbols are shown in table 14.
a The full-stop in the marking symbol may be omitted.
b When low carbon martensitic steels are used for property class 10.9 (see table 2 ).
In the case of small screws or when the shape of the head does not allow the marking as given in table 14 the clock
face marking symbols as given in table 15 may be used.
b Property class
Figure 7 — Examples of marking on hexagon and hexalobular head bolts and screws
9.3.2 Hexagon and hexalobular socket head cap screws
Hexagon and hexalobular socket head cap screws shall be marked with the manufacturer's identification mark and
with the marking symbol of the property class given in table 14.
The marking is obligatory for property classes 8.8 and higher, preferably on the side of the head by indenting or on
the top of the head by indenting or embossing (see figure 8).
Marking is required for hexagon and hexalobular socket head cap screws with nominal diameters d > 5 mm.
9.3.4 Studs
Studs with nominal thread diameters d > 5 mm, of property class 5.6 and property classes 8.8 and higher shall be
marked by indenting with the marking symbol of the property class as given in table 14 and the manufacturer's
identification mark on the unthreaded part of the stud (see Figure 10).
If marking on the unthreaded part is not possible, marking of property class only on the nut end of the stud is
allowed, see figure 10. For studs with interference fit, the marking shall be at the nut end with manufacturer's
identification marking only if it is possible.
Figure 10 — Marking of studs
The symbols in table 16 are permissible as an alternative identification of property classes.
Table 16 — Alternative marking symbols for studs
9.3.5 Other types of bolts and screws
If agreed between the interested parties, the same marking systems as described in the previous paragraphs of
clause 9 shall be used for other types of bolts and screws and for special products.
9.4 Marking of bolts and screws with left-hand thread
Bolts and screws with a left-hand thread shall be marked with the symbol shown in figure 11, either on the top of the
head or on the point.
Marking is required for bolts and screws with nominal thread diameters d > 5 mm.
Figure 11 — Left-hand thread marking
Alternative marking for left-hand thread as shown in figure 12 may be used for hexagon bolts and screws.
(informative)
Lower yield stress or stress at 0,2 % non-proportional elongation at
elevated temperature
The mechanical properties of bolts, screws and studs will vary in a variety of ways with increasing temperature.
Table A.1, which is for guidance only, is an approximate representation of the reduction in lower yield stress or
0,2 % non-proportional elongation which may be experienced at a variety of elevated temperatures. These data
shall not be used as a test requirement.
Table A.1 — Lower yield stress or stress at 0,2 % non-proportional elongation at elevated temperature
Continuous operating at elevated service temperature may result in significant stress relaxation. Typically 100 h
service at 300 °C will result in a permanent reduction in excess of 25 % of the initial clamping load in the bolt due to
decrease in yield stress.
INTERNATIONAL
STANDARD
ISO
898-1
Third edition
1999-08-01
Mechanical properties of fasteners made of
carbon steel and alloy steel —
Part 1:Bolts, screws and studs
Caractéristiques mécaniques des éléments de fixation en acier au carbone
et en acier allié —
Partie 1: Vis et goujons
Foreword
ISO (the International Organization for Standardization) is a worldwide federation of national standards bodies (ISO
member bodies). The work of preparing International Standards is normally carried out through ISO technical
committees. Each member body interested in a subject for which a technical committee has been established has
the right to be represented on that committee. International organizations, governmental and non-governmental, in
liaison with ISO, also take part in the work. ISO collaborates closely with the International Electrotechnical
Commission (IEC) on all matters of electrotechnical standardization.
Draft International Standards adopted by the technical committees are circulated to the member bodies for voting.
Publication as an International Standard requires approval by at least 75 % of the member bodies casting a vote.
International Standard ISO 898-1 was prepared by Technical Committee ISO/TC 2, Fasteners, Subcommittee SC 1,
Mechanical properties of fasteners.
This third edition cancels and replaces the second edition (ISO 898-1:1988) which has been technically revised.
ISO 898 consists of the following parts, under the general title Mechanical properties of fasteners made of carbon
steel and alloy steel:
¾ Part 1: Bolts, screws and nuts
¾ Part 2: Nuts with specified proof load values — Coarse thread
¾ Part 5: Set screws and similar threaded fasteners not under tensile stresses
¾ Part 6: Nuts with specified proof load values — Fine pitch thread
¾ Part 7: Torsional test and minimum torques for bolts and screws with nominal diameter from 1 mm to 10 mm
Annex A of this part of ISO 898 is for information only.
Mechanical properties of fasteners made of carbon steel and alloy steel —
Part 1:Bolts, screws and studs
1 Scope
This part of ISO 898 specifies the mechanical properties of bolts, screws and studs made of carbon steel and alloysteel when tested at an ambient temperature range of 10 °C to 35 °C.
Products conforming to the requirements of this part of ISO 898 are evaluated only in the ambient temperature range
and may not retain the specified mechanical and physical properties at higher and lower temperatures. Attention is
drawn to annex A which provides examples of lower yield stress and stress at 0,2 % non-proportional elongation at
elevated temperatures.
At temperatures lower than the ambient temperature range, a significant change in the properties, particularly impact
strength, may occur. When fasteners are to be used above or below the ambient temperature range it is the
responsibility of the user to ensure that the mechanical and physical properties are suitable for his particular service
conditions.
Certain fasteners may not fulfill the tensile or torsional requirements of this part of ISO 898 because of the geometry of
the head which reduces the shear area in the head as compared to the stress area in the thread such as countersunk,
raised countersunk and cheese heads (see clause 6).
This part of ISO 898 applies to bolts, screws and studs
¾ with coarse pitch thread M1,6 to M39, and fine pitch thread M8 3 1 to M39 3 3;
¾ with triangular ISO thread in accordance with ISO 68-1;
¾ with diameter/pitch combinations in accordance with ISO 261 and ISO 262;
¾ with thread tolerance in accordance with ISO 965-1 and ISO 965-2;
¾ made of carbon steel or alloy steel.
It does not apply to set screws and similar threaded fasteners not under tensile stresses (see ISO 898-5).
It does not specify requirements for such properties as
¾ weldability;
¾ corrosion-resistance;
¾ ability to withstand temperatures above 1 300 °C (1 250 °C for 10.9) or below 2 50 °C;
¾ resistance to shear stress;
¾ fatigue resistance.
NOTE The designation system of this part of ISO 898 may be used for sizes outside the limits laid down in this clause (e.g.
d . 39 mm), provided that all mechanical requirements of the property classes are met.
2 Normative references
The following standards contain provisions which, through reference in this text, constitute provisions of this part of ISO
898. At the time of publication, the editions indicated were valid. All standards are subject to revision, and parties to
agreements based on this part of ISO 898 are encouraged to investigate the possibility of applying the most recent
editions of the standards indicated below. Members of IEC and ISO maintain registers of currently valid International
Standards.
ISO 68-1:1998, ISO general purpose screw threads – Basic profile – Part 1: Metric screw threads.
ISO 83:1976, Steel – Charpy impact test (U-notch).
ISO 261:1998, ISO general purpose metric screw threads – General plan.
ISO 262:1998, ISO general purpose metric screw threads – Selected sizes for screws, bolts and nuts.
ISO 273:1979, Fasteners – Clearance holes for bolts and screws.
ISO 724:1978, ISO general purpose metric screw threads – Basic dimensions.
ISO 898-2:1992, Mechanical properties of fasteners made of carbon steel and alloy steel – Part 2: Nuts with
specified proof load values – Coarse thread.
ISO 898-5:1998, Mechanical properties of fasteners made of carbon steel and alloy steel – Part 5: Set screws and
similar threaded fasteners not under tensile stresses.
ISO 898-7:1992, Mechanical properties of fasteners made of carbon steel and alloy steel – Part 7: Torsional test
and minimum torques for bolts and screws with nominal diameters 1 mm to 10 mm.
ISO 965-1:1998, ISO general purpose metric screw threads – Tolerances – Part 1: Principles and basic data.
ISO 965-2:1998, ISO general purpose metric screw threads – Tolerances – Part 2: Limits of sizes for general
purpose external and internal screw threads – Medium quality.
ISO 6157-1:1988, Fasteners – Surface discontinuities – Part 1: Bolts, screws and studs for general requirements.
ISO 6157-3:1988, Fasteners – Surface discontinuities – Part 3: Bolts, screws and studs for special requirements.
ISO 6506:1981, Metallic materials – Hardness test – Brinell test.
ISO 6507-1:1997, Metallic material – Hardness test – Vickers test – Part 1: Test method.
ISO 6508:1986, Metallic materials – Hardness test – Rockwell test (scales A - B - C - D - E - F - G - H - K).
ISO 6892:1998, Metallic materials – Tensile testing at ambient temperature.
3. Designation system
The designation system for property classes of bolts, screws and studs is shown in table 1. The abscissae show thenominal tensile strength values, Rm, in newtons per square millimetre, while the ordinates show those of the minimum
elongation after fracture, Amin, as a percentage.
The property class symbol consists of two figures:
¾ the first figure indicates 1/100 of the nominal tensile strength in newtons per square millimetre (see 5.1 in
table 3);
¾ the second figure indicates 10 times the ratio between lower yield stress ReL (or stress at 0,2 % nonproportional
elongation Rp0,2) and nominal tensile strength Rm, nom (yield stress ratio).
The multiplication of these two figures will give 1/10 of the yield stress in newtons per square millimetre.
The minimum lower yield stress ReL, min. (or minimum stress at 0,2 % non-proportional elongation Rp0,2, min.) and
minimum tensile strength Rm, min.are equal to or greater than the nominal values (see table 3).
4.Materials
Table 2 specifies steels and tempering temperatures for the different property classes of bolts, screws and studs.The chemical composition shall be assessed in accordance with the relevant ISO standards.
5. Mechanical and physical properties
When tested by the methods described in clause 8, the bolts, screws and studs shall, at ambient temperature, have themechanical and physical properties set out in table 3.
Table 1 — System of coordinates
a .Boron content can reach 0,005 % provided that non-effective boron is controlled by addition of titanium and/or aluminium.
b. Free cutting steel is allowed for these property classes with the following maximum sulfur, phosphorus and lead
contents: sulfur 0,34 %; phosphorus 0,11 %; lead 0,35 %.
c. For nominal diameters above 20 mm the steels specified for property classe 10.9 may be necessary in order to achieve
sufficient hardenability.
d.In case of plain carbon boron steel with a carbon content below 0,25 % (ladle analysis), the minimum manganese
content shall be 0,6 % for property class 8.8 and 0,7 % for 9.8, 10.9 and 10.9.
e. Products shall be additionally identified by underlining the symbol of the property class (see clause 9). All properties of 10.9as specified in table 3 shall be met by 10.9, however, its lower tempering temperature gives it different stress relaxationcharacteristics at elevated temperatures (see annex A).
f. For the materials of these property classes, it is intended that there should be a sufficient hardenability to ensure a structure consisting of approximately 90 % martensite in the core of the threaded sections for the fasteners in the "as-hardened" condition before tempering.
g.This alloy steel shall contain at least one of the following elements in the minimum quantity given: chromium 0,30 %, nickel 0,30 %, molybdenum 0,20 %, vanadium 0,10 %. Where elements are specified in combinations of two, three or four and have alloy contents less than those given above, the limit value to be applied for class determination is 70 % of the sum of the individual limit values shown above for the two, three or four elements concerned.
h.A metallographically detectable white phosphorous enriched layer is not permitted for property class 12.9 on surfaces
subjected to tensile stress.
i .The chemical composition and tempering temperature are under investigation.

6. Mechanical and physical properties to be determined
Two test programmes, A and B, for mechanical and physical properties of bolts, screws and studs, using the
methods described in clause 8, are set out in table 5. Regardless of the choice of test programme, all requirements
of table 3 shall be met.
The application of programme B is always desirable, but is mandatory for products with ultimate tensile loads less
than 500 kN if the application of programme A is not explicitly agreed.
Programme A is suitable for machined test pieces and for bolts with a shank area less than the stress area.
Table 4 — Key to test programmes (see table 5)
Table 5 — Test programmes A and B for acceptance purposes
(These procedures apply to mechanical but not chemical properties)
7 Minimum ultimate tensile loads and proof loads
See tables 6, 7, 8 and 9.Table 6 — Minimum ultimate tensile loads – ISO metric coarse pitch thread
Table 7 — Proof loads – ISO metric coarse pitch thread
a. Where no thread pitch is indicated in a thread designation, coarse pitch is specified. This is given in ISO 261 and ISO 262.
b.To calculate As see 8.2.
c.For structural bolting 50 700 N, 68 800 N and 94 500 N, respectively.
Table 8 — Minimum ultimate tensile loads – ISO metric fine pitch thread
a.P is the pitch of the thread.
b.To calculate As see 8.2.
Table 9 — Proof loads – ISO metric fine pitch thread
The machined test piece shown in figure 1 shall be used for the tensile test. If it is not possible to determine the
elongation after fracture due to the length of the bolt, the reduction of area after fracture shall be measured
providing that Lo is at least 3 do.
When machining the test piece, the reduction of the shank diameter of the heat-treated bolts and screws with
d > 16 mm shall not exceed 25 % of the original diameter (about 44 % of the initial cross-sectional area) of the test
piece.
Products in property classes 4.8, 5.8 and 6.8 (cold work-hardened products) shall be tensile tested full-size
(see 8.2).
When carrying out the test, a minimum free threaded length equal to one diameter (1d) shall be subjected to the
tensile load. In order to meet the requirements of this test, the fracture shall occur in the shank or the free threaded
length of the bolt and not at the junction of the head and the shank.
The speed of testing, as detemined with a free-running cross-head, shall not exceed 25 mm/min. The grips of the
testing machine should be self-aligning to avoid side thrust on the test piece.
8.3 Torsional test
For the torsional test see ISO 898-7.
The test applies to bolts and screws with nominal thread diameters d < 3 mm as well as to short bolts and screws
with nominal thread diameters 3 mm < d < 10 mm which cannot be subjected to a tensile test.
8.4 Hardness test
For routine inspection, hardness of bolts, screws and studs may be determined on the head, end or shank after
removal of any plating or other coating and after suitable preparation of the test piece.
For all property classes, if the maximum hardness is exceeded, a retest shall be conducted at the mid-radius
position, one diameter back from the end, at which position the maximum hardness specified shall not be exceeded.
In case of doubt, the Vickers hardness test is decisive for acceptance.
Hardness readings for the surface hardness shall be taken on the ends or hexagon flats, which shall be prepared by
minimal grinding or polishing to ensure reproducible readings and maintain the original properties of the surface
layer of the material. The Vickers test HV 0,3 shall be the referee test for surface hardness testing.
Surface hardness readings taken at HV 0,3 shall be compared with a similar core hardness reading at HV 0,3 in
order to make a realistic comparison and determine the relative increase which is permissible up to 30 Vickers
points. An increase of more than 30 Vickers points indicates carburization.
For property classes 8.8 to 12.9 the difference between core hardness and surface hardness is decisive for
judgeing of the carburization condition in the surface layer of the bolts, screws or studs.
There may not be a direct relationship between hardness and theoretical tensile strength. Maximum hardness
values have been selected for reasons other than theoretical maximum strength consideration (e.g. to avoid
embrittlement).
NOTE Careful differentiation should be made between an increase in hardness caused by carburization and that due to
heat-treatment or cold working of the surface.
8.4.1 Vickers hardness test
The Vickers hardness test shall be carried out in accordance with ISO 6507-1.
8.4.2 Brinell hardness test
The Brinell hardness test shall be carried out in accordance with ISO 6506.
8.4.3 Rockwell hardness test
The Rockwell hardness test shall be carried out in accordance with ISO 6508.
8.5 Proof load test for full-size bolts and screws
The proof load test consists of two main operations, as follows:
a) application of a specified tensile proof load (see figure 2);
b) measurement of permanent extension, if any, caused by the proof load.
The proof load, as given in tables 7 and 9, shall be applied axially to the bolt in a tensile testing machine. The full
proof load shall be held for 15 s. The length of free thread subjected to the load shall be one diameter (1d).
For screws threaded to the head, the length of free thread subjected to the load shall be as close as practical to one
diameter (1d).
For measurement of permanent extension, the bolt or screw shall be suitably prepared at each end, see figure 2.
Before and after the application of the proof load, the bolt or screw shall be placed in a bench-mounted measuring
instrument fitted with spherical anvils. Gloves or tongs shall be used to minimize measurement error.
To meet the requirements of the proof load test, the length of the bolt, screw or stud after loading shall be the same
as before loading within a tolerance of ± 12,5 mm allowed for measurement error.
The speed of testing, as determined with a free-running cross-head, shall not exceed 3 mm/min. The grips of the
testing machine should be self-aligning to avoid side thrust on the test piece.
Some variables, such as straightness and thread alignment (plus measurement error), may result in apparent
elongation of the fasteners when the proof load is initially applied. In such cases, the fasteners may be retested
using a 3 % greater load, and may be considered satisfactory if the length after this loading is the same as before
this loading (within the 12,5 mm tolerance for measurement error).
8.6 Test for tensile strength under wedge loading of full-size bolts and screws (not studs)
The wedge loading test shall not apply to countersunk head screws.
The test for strength under wedge loading shall be carried out in tensile testing equipment described in ISO 6892
using a wedge as illustrated in figure 3.
The minimum distance from the thread run-out of the bolt to the contact surface of the nut of the fastening device
shall be d. A hardened wedge in accordance with tables 10 and 11 shall be placed under the head of the bolt or
screw. A tensile test shall be continued until fracture occurs.
To meet the requirements of this test, the fracture shall occur in the shank or the free threaded length of the bolt,
and not between the head and the shank. The bolt or screw shall meet the requirements for minimum tensile
strength, either during wedge tensile testing or in a supplementary tensile test without a wedge, according to the
values given for the relevant property class before fracture occurs.
Screws threaded to the head shall pass the requirement of this test if a fracture which causes failure originates in
the free length of thread, even if it has extended or spread into the fillet area or the head before separation.
For product grade C, a radius r1 should be used according to the formula
r1 = rmax 0,2
in which
r =d d
max a max s min2
where r is the radius of curvature under head;
da is the transition diameter;
ds is the diameter of unthreaded shank.
a dh according to ISO 273, medium series (see table 10).
b Hardness: 45 HRC min.
c Radius or chamfer of 45°.
Figure 3 — Wedge loading of full-size bolts
a For square neck bolts, the hole shall be adapted to admit the square neck.
Table 11 — Wedge dimensions
For products with head bearing diameters above 1,7 d which fail the wedge tensile test, the head may be machined
to 1,7 d and re-tested on the wedge angle specified in table 11.
Moreover for products with head bearing diameters above 1,9 d, the 10° wedge angle may be reduced to 6°.
8.7 Impact test for machined test pieces
The impact test shall be carried out in accordance with ISO 83. The test piece shall be taken lengthwise, located as
close to the surface of the bolt or screw as possible. The non-notched side of the test piece shall be located near
the surface of the bolt. Only bolts of nominal thread diameters d > 16 mm can be tested.
8.8 Head soundness test for full-size bolts and screws with d < 10 mm and with lengths too
short to permit wedge load testing
The head soundness test shall be carried out as illustrated in figure 4.
When struck several blows with a hammer, the head of the bolt or screw shall bend to an angle of 90°-b without
showing any sign of cracking at the shank head fillet, when viewed at a magnification of not less than 3 8 nor more than 3 10.Where screws are threaded up to the head, the requirements may be considered met even if a crack should appear
in the first thread, provided that the head does not snap off.
NOTE 1 For dh and r2 (r2 = r1), see table 10.
NOTE 2 The thickness of the test plate should be greater than 2 d.
Figure 4 — Head soundness test
Table 12 — Values of angle b
8.9 Decarburization test: evaluation of surface carbon condition
Using the appropriate measuring method (8.9.2.1 or 8.9.2.2 as applicable), a longitudinal section of the thread shall
be examined to determine whether the height of the zone of base metal (E) and the depth of the zone with complete
decarburization (G), if any, are within specified limits (see figure 5).
The maximum value for G and the formulae for the minimum value for E are specified in table 3.
Key
1 Completely decarburized
2 Partially decarburized
3 Pitch line
4 Base metal
H1 is the external thread height in the maximum material condition.
Figure 5 — Zones of decarburization
8.9.1 Definitions
8.9.1.1
base metal hardness
hardness closest to the surface (when traversing from core to outside diameter) just before an increase or decrease
occurs denoting carburization or decarburization respectively
8.9.1.2
decarburization
generally, loss of carbon at the surface of commercial ferrous materials (steels)
8.9.1.3
partial decarburization
decarburization with loss of carbon sufficient to cause a lighter shade of tempered martensite and significantly lower
hardness than that of the adjacent base metal without, however, showing ferrite grains under metallographic
examination
8.9.1.4
complete decarburization
decarburization with sufficient carbon loss to show only clearly defined ferrite grains under metallographic
examination
8.9.1.5
carburization
result of increasing surface carbon to a content above that of the base metal
8.9.2 Measurement methods
8.9.2.1 Microscopic method
This method allows the determination of E and G.
The specimens to be used are longitudinal sections taken through the thread axis approximately half a nominal
diameter (½ d) from the end of the bolt, screw or stud, after all heat-treatment operations have been performed on
the product. The specimen shall be mounted for grinding and polishing in a clamp or, preferably, a plastic mount.
After mounting, grind and polish the surface in accordance with good metallographic practice.
Etching in a 3 % nital solution (concentrated nitric acid in ethanol) is usually suitable to show changes in
microstructure caused by decarburization.
Unless otherwise agreed between the interested parties, a 3 100 magnification shall be used for examination.
If the microscope is of a type with a ground glass screen, the extent of decarburization can be measured directly
with a scale. If an eyepiece is used for measurement, it should be of an appropriate type, containing a cross-hair or
a scale.
8.9.2.2 Hardness method (Referee method for partial decarburization)
The hardness measurement method is applicable only for threads with pitches, P > 1,25 mm.
The Vickers hardness measurements are made at the three points shown on figure 6. Values for E are given in
table 13. The load shall be 300 g.
The hardness determination for point 3 shall be made on the pitch line of the thread adjacent to the thread on which
determinations at points 1 and 2 are made.
The Vickers hardness value at point 2 (HV2) shall be equal to or greater than that at point 1 (HV1) minus 30 Vickers
units. In this case the height of the non-decarburized zone E shall be at least as specified in table 13.
The Vickers hardness value at point 3 (HV3) shall be equal to or less than that at point 1 (HV1) plus 30 Vickers
units.
Complete decarburization up to the maximum specified in table 3 cannot be detected by the hardness measurement
method.
Dimensions in millimeters
Key
1, 2, 3 Measurement points
4 Pitch line
Figure 6 — Hardness measurement for decarburization test
Table 13 — Values for H1 and E
a For P < 1 mm, microscopic method only.
b Calculated on the basis of the specification in 5.16, see table 3.
8.10 Retempering test
The mean of three core hardness readings on a bolt or screw, tested before and after retempering, shall not differ
by more than 20 HV when retempered at a part temperature 10 °C less than the specified minimum tempering
temperature and held for 30 min.
8.11 Surface discontinuity inspection
For the surface discontinuity inspection, see ISO 6157-1 or ISO 6157-3 as appropriate.
In the case of test programme A the surface discontinuity inspection is applied to test bolts before machining.
9 Marking
Mechanical fasteners manufactured to the requirements of this International Standard shall be marked inaccordance with the provisions of 9.1 to 9.5.
Only if all requirements in this part of ISO 898 are met, shall parts be marked and/or described according to the
designation system described in clause 3.
Unless otherwise specified in the product standard, the height of embossed markings on the top of the head shall
not be included in the head height dimensions.
Marking of slotted and cross recessed screws is not usual.
9.1 Manufacturer's identification marking
A manufacturer's identification mark shall be included during the manufacturing process, on all products which aremarked with property classes. Manufacturer's identification marking is also recommended on products which are
not marked with property class.
For the purposes of this part of ISO 898 a distributor marking fasteners with his unique identification mark shall be
considered a manufacturer.
9.2 Marking symbols for property classMarking symbols are shown in table 14.
a The full-stop in the marking symbol may be omitted.
b When low carbon martensitic steels are used for property class 10.9 (see table 2 ).
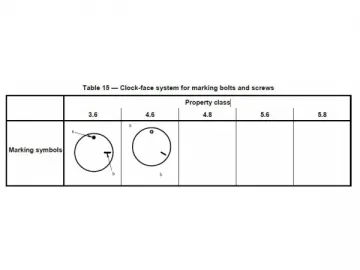
In the case of small screws or when the shape of the head does not allow the marking as given in table 14 the clock
face marking symbols as given in table 15 may be used.
Table 15 — Clock-face system for marking bolts and screws
a Manufacturer's identification mark
b Property class
Figure 7 — Examples of marking on hexagon and hexalobular head bolts and screws
9.3.2 Hexagon and hexalobular socket head cap screws
Hexagon and hexalobular socket head cap screws shall be marked with the manufacturer's identification mark and
with the marking symbol of the property class given in table 14.
The marking is obligatory for property classes 8.8 and higher, preferably on the side of the head by indenting or on
the top of the head by indenting or embossing (see figure 8).
Marking is required for hexagon and hexalobular socket head cap screws with nominal diameters d > 5 mm.
9.3.4 Studs
Studs with nominal thread diameters d > 5 mm, of property class 5.6 and property classes 8.8 and higher shall be
marked by indenting with the marking symbol of the property class as given in table 14 and the manufacturer's
identification mark on the unthreaded part of the stud (see Figure 10).
If marking on the unthreaded part is not possible, marking of property class only on the nut end of the stud is
allowed, see figure 10. For studs with interference fit, the marking shall be at the nut end with manufacturer's
identification marking only if it is possible.
Figure 10 — Marking of studs
The symbols in table 16 are permissible as an alternative identification of property classes.
Table 16 — Alternative marking symbols for studs
9.3.5 Other types of bolts and screws
If agreed between the interested parties, the same marking systems as described in the previous paragraphs of
clause 9 shall be used for other types of bolts and screws and for special products.
9.4 Marking of bolts and screws with left-hand thread
Bolts and screws with a left-hand thread shall be marked with the symbol shown in figure 11, either on the top of the
head or on the point.
Marking is required for bolts and screws with nominal thread diameters d > 5 mm.
Figure 11 — Left-hand thread marking
Alternative marking for left-hand thread as shown in figure 12 may be used for hexagon bolts and screws.
(informative)
Lower yield stress or stress at 0,2 % non-proportional elongation at
elevated temperature
The mechanical properties of bolts, screws and studs will vary in a variety of ways with increasing temperature.
Table A.1, which is for guidance only, is an approximate representation of the reduction in lower yield stress or
0,2 % non-proportional elongation which may be experienced at a variety of elevated temperatures. These data
shall not be used as a test requirement.
Table A.1 — Lower yield stress or stress at 0,2 % non-proportional elongation at elevated temperature
Continuous operating at elevated service temperature may result in significant stress relaxation. Typically 100 h
service at 300 °C will result in a permanent reduction in excess of 25 % of the initial clamping load in the bolt due to
decrease in yield stress.
Scan QR to Read
Links:https://www.globefindpro.com/products/89697.html
Links:https://www.globefindpro.com/products/89697.html
Recommended Products
