Outdoor Light, 4132 Series
Main Features
Motion Sensor (AUTO) – the outdoor lighting is designed to turn on automatically when the sensor detects a temperature difference moving across the front of the motion sensor. The light will turn off automatically according to the set time. The ON-TIME control should be set to 1, 5, or 10 minutes and the wall switch should be left at ON mode all the times.
Manual Mode – the motion activated light can be set to work continuously after dusk for a whole night. Then it will automatically reset to the motion sensing mode.
Specifications
W: 103mm (4'');
E: 169mm (6-2/3'');
H: 282mm (11-1/8'');
Range: up to 30 ft. (9.1m) (varies with ambient temperature);
Sensing angle: up to 150°;
Sensor aiming adjustment angle: 90°;
Electrical load: up to 60 watt incandescent;
Bulb type: medium base, type ‘A’, 60 watt maximum;
Sensor capacity: up to 500 watt (4.1A) maximum tungsten;
Power requirements: 120 V AC, 60 Hz;
Operating modes: TEST, AUTO, and MANUAL MODE;
ON-timer: 1, 5, 10 minutes;
Test timer: 5 seconds;
Manual mode timer: dusk-to-dawn
Installation Notes
Our motion sensing light requires 120 AC V. All wiring must be in accordance with the National Electrical Code. Some local electrical codes require the light to be installed by a qualified electrician. During the wiring process, it is recommended to have an assistant holding the lantern assembly to finish the installation.
For best performance, please mount the fixture about 6 feet (1.8 m) above the ground.
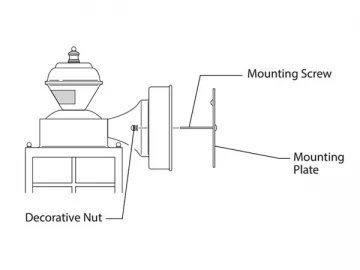
1. Remove 2 decorative nuts
2. Remove the mounting plate
3. Tighten mounting screws finger tight
4. Attach the mounting plate to the junction box
This fixture comes with a universal mounting bracket. It is pre-assembled on the fixture to fit the majority of junction box applications.
If the slots on the mounting plate do not fit the junction box screw holes, you can:
1. Remove the fixture mounting screws from the mounting plate
2. Attach the ground wire ‘pigtail’ to the ground screw on the mounting plate
3. Flip the mounting plate over
4. Rotate the mounting plate so the wire path is on the upper right
5. Reinstall the fixture mounting screws and attach the mounting plate to the junction box as shown

Links:https://globefindpro.com/products/52793.html